Introduction
Table of Contents
Containers do not write data permanently to any storage location. Docker storage needs to be configured if you want your container to store data permanently. This is not intentional because the containers are designed to be small, run quickly, with all backend storage outside the container. Once container is shut down and stopped, it no longer exists. When defined without Docker storage, containers store their data in so-called layers for which they need a storage driver. However, it is possible to preserve the condition of the container in three ways. The first two ways use host’s storage space: volumes and bind mounts. The third way writes directly to the host memory (tmpfs) and can be used for security reasons.
Docker storage
Storage types
Docker storage distinguishes three storage types. Two types are permanent: Docker volumes and bind mounts. From container perspective, it does not know what type of storage is in use. The big difference between the two types is that volumes have dedicated filesystem on the host (/var/lib/ docker/volumes) and are directly controlled through the Docker CLI. On the other hand, bind mounts uses any available host filesystem. The third way of writing data is tmpfs, usage of the host memory. In the end, permanent storage does not increase the size of the container because the data is outside.

Docker storage types
Docker volume
Docker volume is the most commonly used technology for permanently storage of container data. Unlike bind mount, Docker volume is managed by Docker itself and has a dedicated filesystem on the host, does not depend of the filesystem structure on the host. Docker volumes are explicitly managed via the Docker command line and can be created alone or during container initialization. The command used is docker volume create. When stopping or deleting a container, Docker volume remains permanently stored. The volumes can be manually deleted with the docker volume prune command. Multiple containers can be connected to the same Docker volume. Containers can be connected to remote Docker volumes like cloud with specific Docker volumes.
If you mount the container path that already has data on an empty Docker volume, the data will be copied to an empty Docker volume. Also, if we run a container with a volume that does not exist, it will automatically be created for you.
Docker volume use cases
- To share data between multiple containers
- Backup and restore data
- Connect to a remote location (cloud)
- Dedicated container-only filesystem
- Empty Docker volume populates data from container non-empty filesystem
- Works on Linux, Windows and macOS operating systems
Volume or mount flag?
During volume creation, there are two flags that are quite similar but little bit different. Mount is a newer and recommended method of use, because there are many more options that can be defined during container creation and in some cases is the only option to use.
Example 1 (create container with Docker volumes)
We create docker volume with docker volume create:
![]()
Let’s check the existing volumes on host (notice usage of local driver):

If we want to analyze container configuration we use command docker inspect:

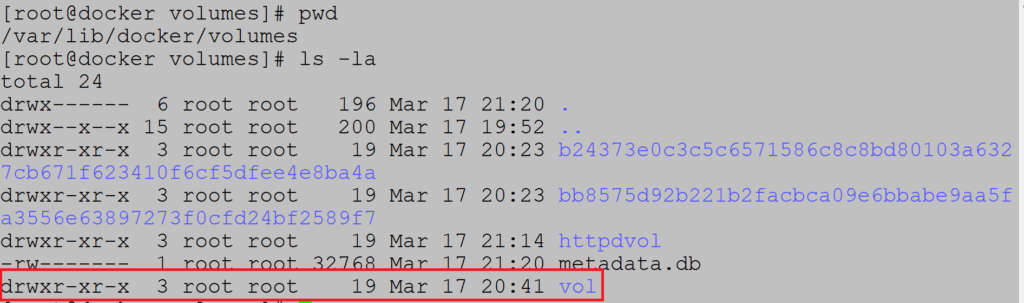
We can see volume creation timestamp, driver, name, additional options and many more. Mount point where data is stored is /var/lib/docker/volumes.
Docker volume is deleted with docker volume rm:
![]()
Let’s create container with volume which is not created before:

Inside container we create new mount point for volume:
On host side (/var/lib/docker/volumes) we can see new Docker volume vol which is created on the fly during container initialization:
Example 2. (read-only volume)
If you want to create read-only volume it can created in following way:
![]()

Example 3. (Data copy from container to empty volume)
If we mount non-empty container filesystem into empty docker volume, volume is populated with content of container filesystem:

Docker volume is populated with container filesystem data:
![]()
Example 4. (Sharing data between containers)
Example includes two containers using Ubuntu image. Start first container and mount volume:![]()
Mount check inside container:![]()
Create test file on mount path:![]()
We can see that second container can access test file:

Example 5. (Volume driver usage)
If we want to use a remote permanent volume like cloud, we use Docker plugins. For the sake of simplicity, we will connect to another docker machine on the same subnet.
First step is installation of ssh plugin:

Second part includes creation of volume on another Docker machine on same subnet:![]()
Check volume creation:

Start container with volume:![]()
Check mount path inside container:
![]()
Example 6. (Total usage report, Volume remove)
To display the current usage of images and container we use the docker system df command:

To remove all volumes use docker volume prune:

Docker bind mount
Docker bind mount is second permanent storage option but with more limited options than Docker volume. Docker bind mount cannot be managed via Docker CLI and is completely dependent on the availability of the filesystem of the host. Good to know is that host filesystem can be created when running a container.
Docker bind mount use cases
- Sharing configuration files from host to container. Example is local DNS records in /etc/hosts.
- Shared source code between host and container
Example 1. (Start container with bind mount )
Start container with bind mount using host filesystem /tmp:
![]()
Check container status:

Example 2. (Mount non-empty directory to bind mount volume)
Unlike the Docker volume, when mounting a path from the host to a non-empty directory in the container, the contents of the directory remain inaccessible for the duration of the mount. Example includes mounting non-empty directory /usr on Ubuntu container:
![]()
We can see that /usr in container is empty:

Example 3. (SELinux)
If SELinux is activated, there are two flags that can be used during bind mounting: z (for sharing data between containers) and Z (for marking directory as private). Be careful if you mount some public directories such as / var and / etc as private.
In this situation we can only use volume flag:
![]()
Tmpfs mounts
Tmpfs is third storage option which is not permanent like Docker volume or bind mount. The data is written directly to the host’s memory and deleted when container is stopped. Very useful when it comes to sensitive data that you do not want to be permanent. A very significant difference is that containers cannot share tmpfs space unless they are running on Linux operating system. Two flags are used when creating tmpfs volume: tmpfs and mount. Mount flag is newer and supports multiple options during container startup.
Example 1. (Start container with tmpfs volume)
Start container with tmpfs volume:
![]()
Status check:
Example 2. (Specify size of tmpfs storage)
Mount flag offers more options for mounting storage and one of them is the size of tmpfs:

Docker storage driver
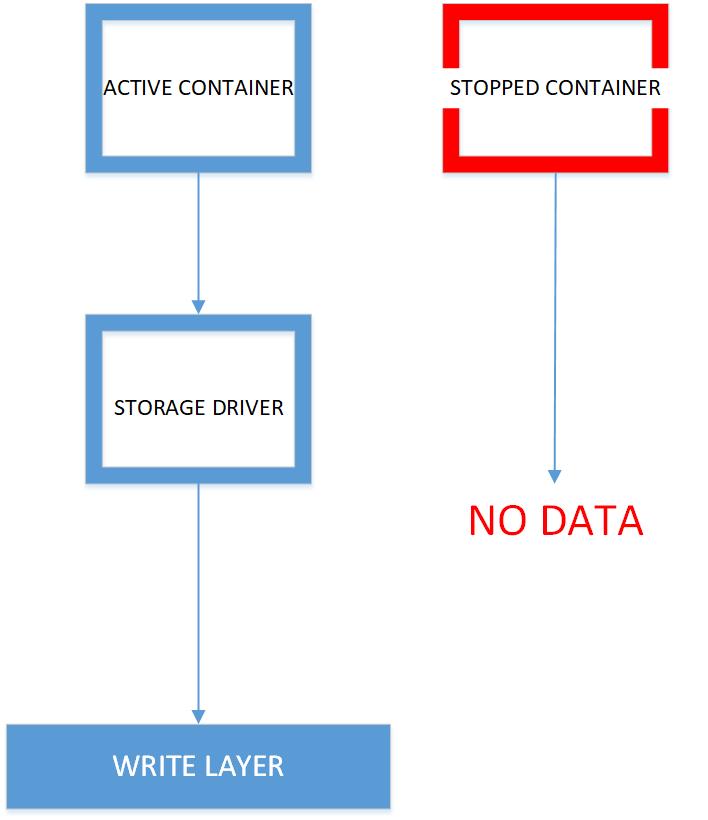
Docker storage driver is responsible for creating container write layer to log all the changes during container runtime. When a container is started with an image, all layers that are part of the image are locked and read-only. Changes are written to the record layer and deleted when container is stopped. The driver creates Union filesystem that allows filesystems to be shared from all layers. This is the default way to store data in a container unless the storage technologies described above are used. It is important to note that extra driver layer brings additional performance overhead. It is not recommended to use default storage option for write intensive containers like database systems.
Let’s look at an example:

FROM UBUNTU
RUN yum update
Container creates two layers: Ubuntu image and running yum update command. When the container is started, those two layers are started in read only mode. All changes are written to the write layer above. This is enabled by the storage driver. Default storage driver is overlay2.
If you start more containers from same image, all of them share the read-only layer. Only layer which is different is write layer. Each container has its own write layer.
Example (Usage status)
Check storage use on disk with command docker ps –s:

Size of 2B is related to write layer and 165MB is sum of read-only layers and write layer. If you want to calculate how many space multiple containers occupy, we have to summarize all write layers with single read-only layers because all containers from same image share same read-only layers. Storage calculation does not include persistent and non-persistent storage: volumes, bind mounts and tmpfs.
Example:
3 containers from same image
Image size: 100MB
Write layer: 1MB
Total size: 3x write layer + read-only layer = 103MB
Copy on write technology
Copy on write strategy brings performance benefit during write layer operations. If write layer needs to read-only data it just reads from lower read-only layers. Does not need to copy the data to write layer and improves performance by reducing container size. If container needs to modify file, it is copied to write layer and modified. For containers which are write heavy, it is not recommended to use the storage driver and copy on write technology.
Example (Content list of local images)
Docker images consists of one or more layers. Let’s check httpd image
Local image list:

Inspect httpd image layer with docker history command:
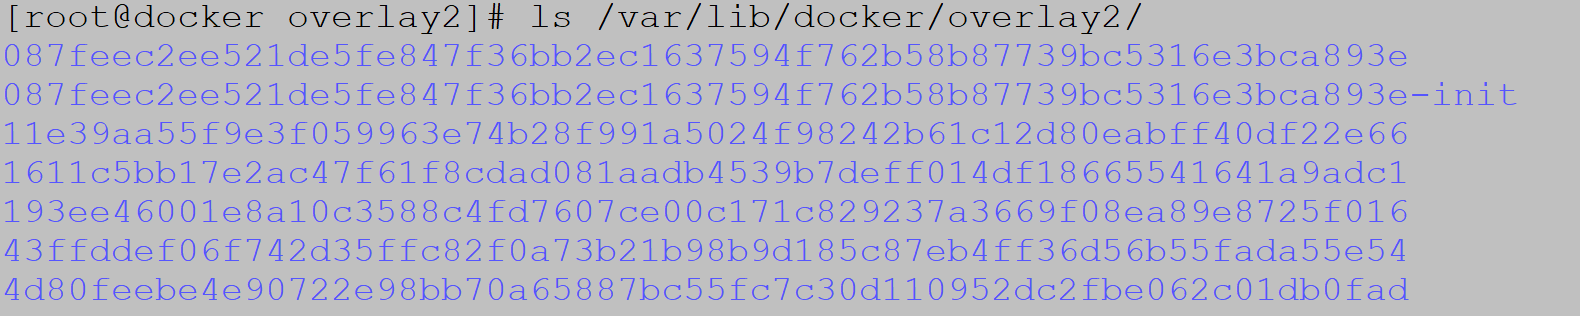
All layers are stored on path /var/lib/docker/overlay2, where overlay2 is default storage driver.